스프링 시큐리티
- 어플리케이션의 보안(인증 및 권한)을 담당하는 프레임워크
- 스프링 시큐리티를 적용하면 redirect를 자동으로 설정 가능(로그인 완료시 다음 화면으로 넘어가기)
특징
- 필터 기반으로 동작
- bean으로 설정 가능
용어
1. Principal(인증 주체): 유저
2. Authenticate(인증): 현재 유저가 누구인지 확인(로그인)
3. Authorize(인가): 현재 유저의 권한 검사
4. 권한: 인증 주체가 어플리케이션의 동작을 수행할 수 있도록 허락 되었는지 확인
- 권한 승인이 필요한 부분으로 접근하려면 인증(로그인)을 통해 증명되어야 함
인증(로그인)을 거치게 되면 인증 주체에 대한 정보는 Principal에 담긴다.
(Principal은 UserDetailsService에서 리턴한 UserDetails 정보)
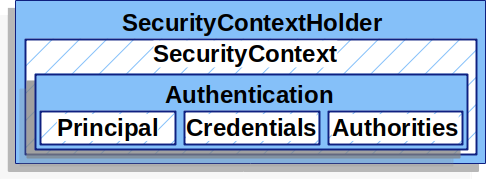
Authentication
- 인증 정보를 담고 있는 객체
Principal
- 내가 누구인지에 대한 정보를 담는 객체
- 로그인 ID, username에 해당하는 값을 담음
Credntials
- 인증자격에 대한 정보를 담은 객체
- 비밀번호와 같은 암호 값
Authorities
- 현재 유저의 권한(ROLE_USER, ROLE_ADMIN, ROLE_GUEST) 정보를 담은 객체
SecurityContextHolder
- 시큐리티가 최종적으로 제공하는 객체
- 인증에 대한 정보는 Authentication 객체에 있고, 최종적으로 SecurityContextHolder에 저장됨
왜 SecurityContextHolder에 저장할까?
SecurityContext 객체를 Thread-local로 제공하기 때문(같은 스레드에서는 언제든지 인증정보에 접근 가능하기 때문)
public class SecurityUtil {

    private SecurityUtil() { }

    public static String getCurrentMemberId() {
        final Authentication authentication = SecurityContextHolder.getContext().getAuthentication();

        if (authentication == null || authentication.getName() == null) {
            throw new RuntimeException("Security Context 에 인증 정보가 없습니다.");
        }

        return authentication.getName();
    }

}
final Authentication authentication = SecurityContextHolder.getContext().getAuthentication();현재 유저의 인증정보(authentication)를 SecurityContextHolder로 부터 가져오고,
authentication.getName()을 통해 인증 객체의 이름을 반환한다.
@Component
@RequiredArgsConstructor
public class UserUtil {

    private final UserRepository userRepository;

    public User findCurrentUser() {
        User user = userRepository.findByUserId(SecurityUtil.getCurrentMemberId())
                .orElseThrow(() -> new CustomException(ErrorCode.NOT_FOUND_MEMBER));

        return user;
    }

}
UserUtil 클래스는 SecurityUtil의 getCurrentMemberId()의 메서드를 불러와서 찾은 유저를 반환한다.
스프링 시큐리티의 구조

1. Http Request 수신
- 스프링 시큐리티는 필터로 동작한다.
- 요청이 들어오면, 인증과 권한을 위한 필터(Authentication Filter)를 통하게 된다.
2. 유저 자격을 기반으로 인증 토큰(UsernamePasswordAuthenticationToken) 만들기
- username과 password를 요청으로 유저 자격 기반으로 UsernamePasswordAuthenticationToken 생성한다.
3. Authentication Filter를 통해 인증 토큰을 AuthenticationManager에 위임
- AutheticationManager는 인증을 처리하는 방법을 정의한 API이다.
- 인증 토큰이 생성된 후, AuthenticationManager의 인증 메서드 호출
- AuthenticationManager는 인터페이스로 정의 (실제 구현: ProviderManager에서 시행)
public interface AuthenticationManager{
  Authentication authenticate(Authentication authentication) throws AuthenticationException;
}
AuthenticationManager를 사용하기 위해 Builder를 이용해 UserDetailsService를 매핑시켜준다.
@Override
protected void configure(AuthenticationManagerBuilder auth) throws Exception{   auth.userDetailsService(customUserDetailsService); }
ProviderManager는 AuthenticationProvider의 구성 목록을 가진다.
ProviderManager는 AuthenticationProvider에 각각의 목록을 제공하고, 인증 토큰을 기반으로 만들어진 인증을 시도한다.
각 AuthenticationProvider는 인증 성공, 실패, 결정할 수 없음을 나타낼 수 있음
public class ProviderManager implements AuthenticationManager, MessageSourceAware, InitializingBean { ... }
4. AuthenticationProvider의 목록으로 인증 시도
public interface AuthenticationProvider {
    Authentication authenticate(Authentication authentication) throws AuthenticationException;
    boolean supports(Class<?> authentication);
}
각각의 AuthenticationProvider는 특정 유형의 인증을 수행한다.
- CasAuthenticationProvider
- JaasAuthenticationProvider
- DaoAuthenticationProvider (DB 기반 id/password 인증)
- OpenIDAuthenticationProvider
- RememberMeAuthenticationProvider
- LdapAuthenticationProvider
- id, password 기반 인증 경우 : username / password 가 유효한지 검사
- id, password 외 인증 경우(saml 인증) 등..
5. UserDetailsService의 요구
- UserDetailsService는 username 기반의 userDetails 검색
- AuthenticationProvider의 DaoAuthenticationProvider를 사용
- UserDetailsService는 인터페이스이기 때문에 UserDetails를 가져오는 CustomUserDetailService 생성
public interface UserDetailsService
{
  UserDetails loadUserByUsername(String username) throws UsernameNotFoundException;
}
@Service
@RequiredArgsConstructor
public class CustomUserDetailsService implements UserDetailsService {
private final UserRepository userRepository;
@Override
public UserDetails loadUserByUsername(String username) throws UsernameNotFoundException {
User user = userRepository.findByUserId(username)
.orElseThrow(() -> new UsernameNotFoundException("Can not find username."));
return CustomUserDetails.create(user);
}
}6. UserDetail를 이용해서 User 객체에 대한 정보 검색
- UserDetails는 인터페이스로, 우리가 직접 생성한 User 객체에서 정보를 가져올때 사용
 public interface UserDetails extends Serializable {
      Collection<? extends GrantedAuthority> getAuthorities();
      String getPassword();
        String getUsername();
      ...
    }
    ```
@Getter
@Setter
@AllArgsConstructor
@RequiredArgsConstructor
public class CustomUserDetails implements OAuth2User, UserDetails, OidcUser {

    private final String userId;
    private final ProviderType providerType;
    private final RoleType roleType;
    private final Collection<GrantedAuthority> authorities;
    private Map<String, Object> attributes;

    @Override
    public Map<String, Object> getAttributes() {
        return attributes;
    }

    @Override
    public Collection<? extends GrantedAuthority> getAuthorities() {
        return authorities;
    }

    @Override
    public String getPassword() {
        return null;
    }

    @Override
    public String getUsername() {
        return userId;
    }

    @Override
    public String getName() {
        return userId;
    }

    @Override
    public boolean isAccountNonExpired() {
        return true;
    }

    @Override
    public boolean isAccountNonLocked() {
        return true;
    }

    @Override
    public boolean isCredentialsNonExpired() {
        return true;
    }

    @Override
    public boolean isEnabled() {
        return true;
    }

    @Override
    public Map<String, Object> getClaims() {
        return null;
    }

    @Override
    public OidcUserInfo getUserInfo() {
        return null;
    }

    @Override
    public OidcIdToken getIdToken() {
        return null;
    }

    public static CustomUserDetails create(User user) {
        return new CustomUserDetails(
                user.getUserId(),
                user.getProviderType(),
                RoleType.USER,
                Collections.singletonList(new SimpleGrantedAuthority(RoleType.USER.getCode()))
        );
    }

    public static CustomUserDetails create(User user, Map<String, Object> attributes) {
        CustomUserDetails userPrincipal = create(user);
        userPrincipal.setAttributes(attributes);

        return userPrincipal;
    }

}
7. User객체의 정보를 UserDetails가 UserDetailsService에 전달
- 데이터베이스에서 User 객체 정보를 가져와 UserDetailsService에 전달
- UserDetailsService에서 username을 기반으로 검색 시행
- loadUsername은 UserDetailsService가 구현을 필수로 하는 메서드
- 반환 값으로 User(org.springframework.security.core.userdetails에서 기본적으로 제공해주는 User 객체)에 id, password, 권한 정보를 넣어서 반환
- 혹은 UserDetails 인터페이스를 구현하여 반환
8. 인증 객체 또는 AuthenticationException
1. 유저의 인증이 성공하면 인증 객체 반환
- 인증 실패시 AuthenticationException 처리
2. 인증 객체(Authentication)의 정보
- authenticated - true
- grant authorities list : 권한 정보(ROLE_USER, ROLE_ADMIN 등)
- user credentials : 인증자격에 대한 정보를 담은 객체 (비밀번호)
9. 인증이 끝나면 -> AuthenticationManager는 완전한 인증 객체를 Authentication Filter에 반환한다.
10. SecurityContext에 인증 객체를 설정한다.
- AuthenticationFilter는 인증 객체를 SecurityContext에 저장한다.
SecurityContextHolder.getContext().setAuthentication(authentication);
[참조 목록]
[Security] 스프링 시큐리티의 아키텍처(구조) 및 흐름
Spring Security 스프링 시큐리티리란? 어플리케이션의 보안(인증 및 권한)을 담당하는 프레임워크 Spring Security를 사용하지 않으면 자체적으로 세션을 체크해야 한다. redirect를 일일이 설정해주어야
twer.tistory.com
https://gregor77.github.io/2021/05/18/spring-security-03/
Spring Security - 3. 인증 절차를 정의하는 AuthenticationProvider
Spring Security에서 어떻게 인증이 시작될까?Spring security는 내부에 인증 절차가 이미 구현되어 있다. spring security의 인증 절차를 이해하고 난다면, 구현체와 설정을 통해서 새로운 인증 절차를 추가
gregor77.github.io
Spring Security - 인증 절차 인터페이스 구현 (1) UserDetailsService, UserDetails
UserDetailsService 인터페이스는 DB에서 유저 정보를 가져오는 역할을 한다. 해당 인터페이스의 메소드에서 DB의 유저 정보를 가져와서 AuthenticationProvider 인터페이스로 유저 정보를 리턴하면, 그 곳
to-dy.tistory.com
'백엔드 > 스프링' 카테고리의 다른 글
| Webflux와 R2DBC (0) | 2024.09.05 |
|---|---|
| 스프링으로 AOP 구현해보기 - 4가지 구현 관점 (0) | 2022.03.29 |
| 자바 AOP 예제 정리 - 순수 자바로 AOP 구현해보기 (0) | 2022.03.22 |
| 스프링 AOP 정리 - 스프링 핵심 원리 - 고급편 (0) | 2022.03.22 |
| ApplicationContext 정리 - 스프링 핵심원리 기본편 (0) | 2022.03.14 |